Posts

Showing posts from 2014

DHT11 incubator with I2C LCD (part 1)

Image
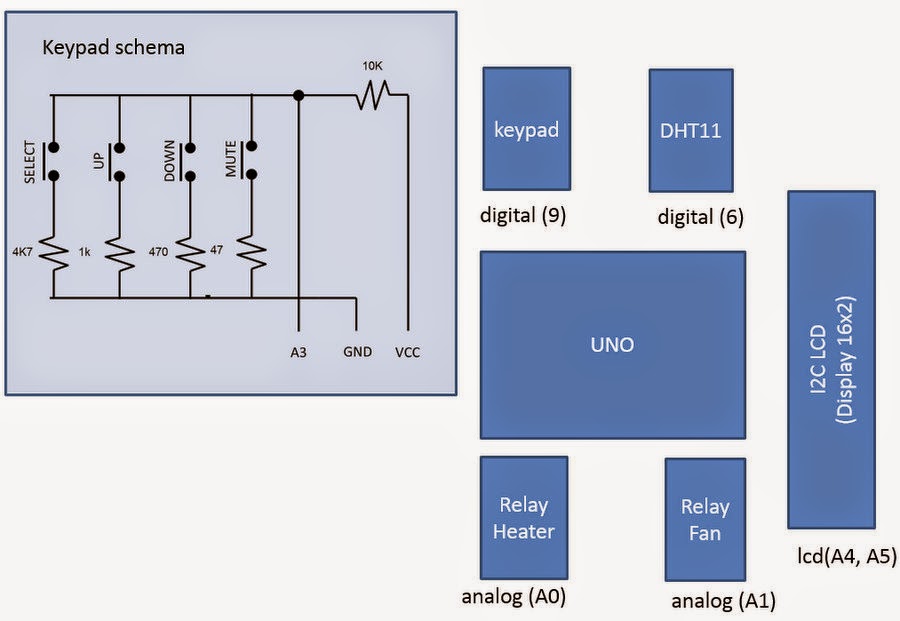
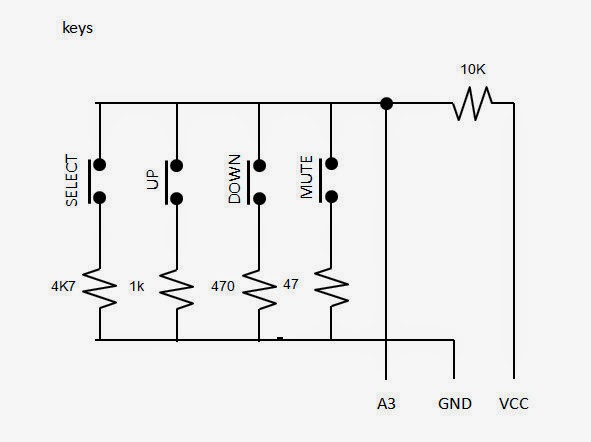
DESCRIPTION DHT11 is applied as a sensor for temperature and humidity. To control temperature, a relay is used and connected to heating elements. Humidity and Temperature are displayed on a 16x2 LCD via I2C/PCF8574. On the next iteration, there will be: an additional relay to control a cooling fan humidity control via pneumatic parts button as controls to set the TempTarget and HumiTarget. However, other incubator implementing LM35 as temperature sensor is already explained on this link EQUIPMENT IN USE This incubator uses a clone of Arduino UNO, DFRduino v2.1, a DHT11 sensor, a relay, and a LCD 16x2 connected to I2C module (PCF8574). DIAGRAM AND PICTURES THE CODE you can grab the code here

Herry's Hybrid Sun and Element Drier Project with Arduino

Image
Herry's Hybrid Sun and Element Drier  with Arduino is an undergraduate student final project at THP Mulawarman University . The aim is to produce a hybrid sun + electric drier for agricultural products, mainly focusing on herbal products. This sketch is version 1.0 as of October 2014.   Our Past Abstract

Updating vmail-1.7

Just a minute note on installing Postfix with MySQL and virtualmail on Slackware linux. The explanation can be read from here . Old versions of this note are available from here . Feel free to discuss and improve the files as I am doing this in very limited time and as for fun only. Anyone to co-write for next version, please contact me via email/my profile. Cheers,

Minute note on avoiding email server from spam blacklist database

Maintaining reputable email server is increasingly time demanding, no only complying to different 'standards' from major MTA providers, but also dealing with bad habit of the users and ever growing innovative ways of user account collectors and spam engine ditchers. I will try to list some of the most important settings that are required for a high reputation email server, so that any email sent from the account will not fall into spam folder: A dedicated IP Closed Relay Reverse DNS SPF  for every domain, including sub-domains. DKIM  for every domain, including sub-domains. Valid SSL certificate SSL and TLS connection A good configuration, i.e. Postfix UCE Forcing password to expire after some months For incoming email, it is equally important to set several hurdles like greylist , spamassassin , and anti-virus for the email server. Refreshing users about do and dont  with corporate email.  A good communication with spam blacklist providers, in case the email s

Burning Arduino Bootloader to ATmega328P-PU with Pro Mini

Image
Introduction The good thing about Arduino is the capability of becoming an USB programmer for other minimum system. In today's case, I burn ATmega328P-PU on a breadboard with an Arduino Pro-Mini that is coonected to a computer via FTDI. Hardware Setup An FTDI cable Arduino Pro-Mini, my version is ATmega 328, 16MHz, 5v . Minimum system of Arduino with ATmega 328P-PU chip.   capacitors: a 100nF connecting DTR from FTDI to Arduino Pro Mini, and a 10uF connecting RST to GND on breadboard. some jumper cables. Step by step Open the tool tab and select Arduino Pro-Mini 5v, 16MHz, ATmega 328 from the board list of the Arduino IDE Open the example sketch, select Arduino ISP, and then upload the compiled program to Arduino Pro-Mini. Connect D10 of Arduino Pro-Mini to RST of the targeted chip on breadboard, then connect a 10uF connecting RST to GND on breadboard. Connect D11, D12, D13, VCC, and GND of Arduino Pro-mini to the respective I/O of the targeted chip

Analog read smoothing with Arduino

Introduction This is a bit more technical and I will update the article if in the future there is a mistake/misconception in applying the correct algorithm which I believe is already sufficient for the smoothing of analogue value reading from Arduino. There are many methods of value smoothing, categorized in software based high pass filter, low pass filter, Butterworth filter, etc. But this does not mean that it will increase accuracy of a value generated by a probe. It will only increase the reproducibility within the accuracy range. For example, a typical k-type thermocouple has accuracy of ±12 LSB (equal to ±3.00°C) when connected via Maxim 6675 amplifier and 5v DC. To increase the accuracy, a careful calibration (i.e. 4/5 degree polynomial equation, or a lookup table) may be needed.  For a greater accuracy, it is recommended to use different probe as discussed here .  Methods of averaging To acquire a reproducible average, mode and median filters  are commonly imple

Writing and reading float using Arduino EEPROM

This post is just for a personal reminder after reading discussions from elsewhere about storing and reading float values to/from EEPROM with Arduino. Scenario Writing negative float to EEPROM can be tricky, since EEPROM only recognises up to 8-bit values (see Tronixstuff  explanation ), therefore it requires an additional algorithm to make it able to store negative and float.  the scheme is to use four bits of the ATmega328's EEPROM to store numerical parts of a float value. The function involved is union . //union  value typedef union{   float flt;   byte array[4]; } FloatConverter; The code You may grab the code here

A simple tank robot v1

Image
Inspired by:  Barry Miller's tank robot , I wanted to clone his niche Tamiya tank. Hardware setup The list of hardware required is: an Arduino uno R3 Tamiya twin gearbox motor (left right independent) a L293D motor driver (homemade) Tamiya track and wheel set Tamiya twin multi-purpose plate a small breadboard a pinger ( HC-SR4 ) a standard servo or a mini servo an infrared proximity sensor ( GP2Y0A21YK ) All parts were available at Klinik Robot or similar websites. After arranging, here is the front look:  The Program You may grab the code here Lets the fun starts Enjoy!

NTC Thermistor Incubator Part 3: Integrating double digits 7-segment

Image
This is a close to final version of my triplet NTC thermistors incubator with multi-buttons on a single analog input and double digits 7 segment output.  You may read part1 and part2 , for the whole story. On a separated article, I replaced NTC thermistor and 7segment with LM35 probe and LCD 16x2,  here . Hardware setup I use  Arduino standalone on breadboard , common anode double digits 7 segment  16 pins, two 74HC595 s, three NTC thermistor s, an FTDI 5v uploader ,  an optocoupler protected relay module , resistors (10kΩ, 1kΩ, 4k7Ω, 470Ω, 220Ω and 47Ω), and push buttons. Since the 7 segment that I purchased has no datasheet, it is important to look at other version of common anode (tandyonline.co.uk): The final setup on breadboard: The codes You may grab the codes here What next? Obviously, the next step is to print a PCB ( there is a great tutorial  on the Tube, or if you understand Bahasa Indonesia, here is a great tutorial from Duwi ) for this project and to

LM35 Incubator with LCD 16x2 on Arduino

Image
Past articles: NTC thermistor incubator (part 1): connecting triple thermistor NTC thermistor incubator (part 2): multi-buttons input for single Analog pin   Introducing CodeBender Today I found a great code sharing website called codebender  that allows me to use Arduino in any computer since it has online IDE with crossplatform browser plugin to upload to Arduino system. Remember, Arduino is an Open Source Hardware project, I encourage people to share as much as we learn from others too. Sharing knowledge is awesome! Since everything is online and pretty straight forward, I will try to explain my project as simple as possible. The Aim My aim is still to produce an incubator, but today the specification will be: Internal LM35 temperature sensor that will be placed inside the incubator External LM35 temperature sensor that will monitor ambient/room temperature Peltier element that will be connected through a relay module Displaying internal (current temp, CT), e

Multi buttons input for single analog pin on Arduino

Image
This article is a part of NTC-thermistor incubator with Arduino (part 2)  For triple NTC-thermistor probes (part1)  access here . Hi again, today I continue my little experimentation with Arduino. The ultimate aim is to have a homemade incubator. This article will discuss a way to have a user input for some parameters in my incubator, like upper temperature limit ( upperTemp ), lower temperature limit ( lowerTemp ), heating and cooling time during the normal operation ( heatingTime and coolingTime , respectively). HARDWARE SETUP To enable user input, I selected four push buttons, representing select menu,  down, up, and mute buttons.  Learning from an Arduino page , it is fairly simple to understand the logic of multi buttons input for a single analog pin. I employed four different resistors to give different input values to an Arduino analog pin. For this,  I prepared electronic parts: 4x four-legged push buttons,  1x 10kΩ, 1x 4.7 kΩ, 1x 1kΩ, 1x 470Ω, and 1x 47Ω

NTC-thermistor incubator with Arduino

Image
Recently, when I stuck with limited lab equipments and decided to produce some for my agricultural post-harvest related research, my eyes fixed with Arduino ! This is enough to wake up my old time hobby with electronics (what I really mean was soldering, XD). I never touch them for the past 15 years. I am a total noob in this matter. Arduino recreates a new passion, just like when I learned GNU/Linux some 10 years ago.  Last year, I purchased an Arduino UNO R3 for the purpose of learning and found this is incredibly simple to deliver solutions in my field. I do not need (and do not want too) to learn assembler or AVR  languages in depth, just to produce thermocouple logger for cacao fermentation or to build a small scale DC powered incubator for example. Arduino UNO (pic. from www.arduino.cc) HARDWARE SETUP Enough talking, now I proceed to the core of the article, a tutorial for NTC-thermistor incubator. In this occasion, a “brain” for incubator using negative temperatu